How to make stems or sub groups in Pro Tools is a relatively easy process so long as you remember some key audio engineering terms so that you remember what should be done for the best results. The steps are below.
There are a couple things you MUST know before creating stems / subgroups while mixing, which is what we cover first. The more you know about the technical as well as creative aspects, the better you’ll be at mixing music whether that’s in Pro Tools or on a large analog console.
For those who are newer to mixing audio: why do you want to create stems? (And what is a mix stem, for that matter)? Stems are a way to sub mix certain tracks before they get put into the main mix (stereo or surround). Sometimes you want to do this for simple level control of the group (like subgrouping the drums in a stereo sub group so you can easily increase or decrease the level of the drums within the mix). Sometimes it’s more complex, like for effects or preparing for mastering. (Note: As a specific term, “stem” is more often used in Post Production whereas in music recording studios you’ll hear it more often called sub groups or sub mixes).
The most common use for stems / subgroups in mixing was mentioned above: creating a drum submix or subgroup so that you can easily control the level of the entire drum kit. Moreover, you can also then EQ and compress the stem separately to help refine aspects of your mix to help it blend together; this technique ultimately tends to get you a slightly higher RMS level in your mix (i.e. it makes it “louder” and more powerful). In order to process your stems, however, you have to use techniques that pass signal, NOT mix-only options like Mix Groups in Pro Tools or VCA subgroups that only change level: you have to re-rout the signals to different outputs, then through your new channel(s) which then are assigned to the mix so you can hear them again.
Common uses of stems or sub groups include: drums, background vocals, guitars, keys, and sound effects; basically “like type” instruments getting grouped together to facilitate processing and make your life easier in the final mix.
Creating stems in Pro Tools requires basic knowledge of the input and output routing on a track, and creating a Bus or Aux track.
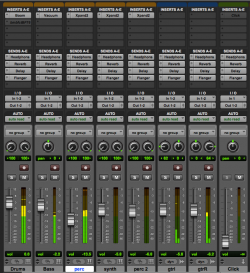 IMPORTANT NOTE: Unless you want to play with parallel compression, you DO NOT use the sends to create stems and sub groups (it results in double monitoring, which is dangerous to your sound by creating phase issues). Proper stem creation requires changing the OUTPUT of the audio tracks so that the only place you actually hear the track’s signal is via the subgroup. Basic set up is: route the output of all your audio tracks to the input of a stereo Aux/Bus track (but read all the steps, there are a couple other things you need to do to be safe).
We’ll use drum stem as the example:
- Create new Aux track (stereo) (shift + command + N). Make sure it’s stereo so that you don’t lose the stereo image you already have in your drum mix. Name it.
- Change the INPUT of the STEREO AUX TRACK to an unused BUS in the system. When you select the input (I’m using the mix window here) you’ll see the inputs for your audio interface as well as the internal busses. Pick an internal bus that is NOT being used (it will be a stereo L/R pair since you created a stereo aux input track).
- Solo Isolate that Stereo Aux track. (command + click on the solo button of the Aux track). This is the part most new engineers forget because they’ve never even heard of solo isolate. Solo isolating is sort of like “protecting” whatever you solo isolate from being muted or cut. It works in SIP or Mixdown solo mode, which actually is NOT solo’ing so much as the console cuts all the other channels so that you only hear what’s “solo’d” in the mix bus. So, solo isolating your subgroup protects it from being cut so that you can still hear whatever is feeding the subgroup channel. When mixing, you tend to always solo isolate all your Effects returns and subgroups. (Example: if your drums are in a subgroup, at some point you’ll want to be able to solo your snare drum… but if you don’t solo isolate the subgroup its in, then the subgroup will also get cut… therefore you don’t hear anything. Biggest mistake new engineers make is they tend to solo isolate all the tracks going INTO the subgroup (in this case, kick drum, snare, high hat, etc.), but you want the exact opposite: you solo isolate what’s being fed, not that which feeds it. Solo isolate the effects returns and group returns, and not the things that send to those things.
- The above three steps create and prepare the stereo sub group fader on your “console” in your DAW. The rest of the steps are to route the signals so that they go into to that fader therefore allowing you to control them all with your new stereo aux input.
- Select all of the drum tracks (so the faders / names are highlighted).
- Hold down Shift and Option. This translates to “apply to all: (with option) selected (adding shift), so that changing one of the selected tracks with those two keys help down will apply that change to all other selected tracks.
- (With shift + option held down first) Change the OUTPUT of the drum tracks so that it is the SAME INTERNAL BUS as the INPUT of the AUX track (your sub / stem fader that you set up above). That will change the output of all selected tracks to the input the subgroup fader you just created.
- Now you know how to create a stem / subgoup in Pro Tools. Hit play :)
Note: Stems and Sub groups ARE NOT the same as mix groups in Pro Tools. Mix Groups apply to fader levels, virtually linking them together so that they travel relative to one another when you move just one. Sub Groups and Stems combine the signals in the same manner that your master fader does so that you can PROCESS the combined signal as well as change the level.
Have fun :)


