 Commercially speaking, the sound quality of digital audio is not as important as is used to be. Most people don’t care about the differences between high quality digital audio recording and those done with bad A/D converters and poor recording techniques. That makes anyone who has made audio engineering and music production part of their lives a bit annoyed. Unfortunately, we’re catering to a world that listens almost exclusively to digitalized music, and the vast majority of them MP3s. You can, however, get a good digital audio recording setup in your home studio with just a little bit of knowledge and investing in some specific parts of your studio set up.
So we deal with it, right? Since we all can’t have a 2-inch tape machine and a big ‘ole Neve in our home studio, I might as well stop complaining and focus on those things that we CAN do to improve the sound of a digital recording to get a quality recording at home.
Digital Home Recording Tips:
- Understand how digital audio actually works. (BORING, but helps). Pro Tools 10, for example, boasts of 32 bit floating point processing… any idea what that means? Even if you’re not sure how it works, what aspects of your sound does that help improve by decreasing the distortion created during encoding and processing digital audio? WHY? Knowing the sound capture and recreation capabilities of files of varying bit depth and sample rate is part of starting your entire recording session. If you’re bringing in samples vs. recording a string quartet… the bit depth and sample rate have an impact on the ability to capture the sound.
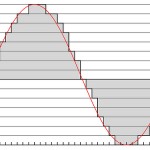
- Fundamentally: Sample rate determines the maximum frequency you can sample (high frequencies) and bit depth determines the dynamic range (dynamic range insofar a how accurate it can be, not how “high” or “loud” the sound wave can be). See those steps in that image? If you have a low bit depth, than those steps have really big differences in height; they jump, whereas a high bit depth (24 bit, 32 floating) allow very very small differences in the height of the “steps”. Like having a volume knob with 1 through 10 that clicks at each space vs. one that has can smoothly sweep between all those values. With sample rate, the higher it is, the higher the frequency you can capture, so if you have instruments with lots of overtones and/or you want a very natural sound, then you want to be able to capture all those really high frequencies, and hence, you want a higher sample rate.
- A/D Converter.Spend money here. Built-in doesn’t cut it. Buy an Apogee Digital or a Prism Sound.
 The A/D process is likely the most important part of the process. If you get a good converter, then your recorded sound will have a more noticeable depth and natural character. It will have a smoother tone and generally feel less harsh than analog to digital converters of lesser quality. If the A/D converter is bad, then the sound becomes more synthetic and shallow; flat sounding, and you’ll have a lot more noise overall in the signal.
 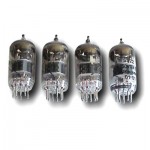 Use tubes. Whether while recording or to run signal through while mixing, grab a couple tube pre-amps and EQs. Home recording guys are always talking about that illusive “FAT SOUND” and making it louder ISN’T IT. A huge sound is a combination of the signal’s frequency, energy and dynamic character; how they’re working together to get a strong RMS and peak level coupled with lively frequency “action” (not just squashing the thing with a limiter or maximizer). Tubes color the sound by adding “warm” distortion (coloration: audio distortion in that the output signal is different than the input. This “distortion” is pleasing to the ear due to the overtones / harmonics that are created. Adding that coloration helps “fatten” and “warm” the sound.
- Try stem mixing. Rather than mix all your tracks to a master, try creating a set of subgroups for each section of the track (drums, guitars, keys, background vocals, etc.) and mix those as if they are the entire mix (but DON”T OVER COMPRESS!!!). Get the stems sounding OK and give them just a little bit of sum compression, then bring them all together in the full mix to see if it has more power, but doesn’t sacrifice depth and dynamics.
- Leave room for mastering. Since digital audio is generally more brittle sounding than analog (or crisp, clean, thin… however you want to describe it), you don’t want to push it too hard when mixing your song. You do not have to mix at 0 DFS. You don’t have to normalize or maximize while mixing (please don’t, actually). Mix, even high energy tracks, at a healthy level, but not pushing it. Don’t try to make it sound LOUD when mixing: try to make it sound GOOD. Well balanced and powerful if you crank your monitors. To let mastering do its job you need to leave it some room to work.
Published: by | Updated: 08-26-2014 17:19:04


