Related Article: Mixing Drums (take two)

Some mixing concepts are straight forward, others will take a little time to set up with your signal routing on the console or mix window. Above all else: experiment with each technique in your mix. Becoming a good mixer takes time. Even if you have great ears and good instinct, you still have to learn the technology and techniques in order to get the sound you want. When mixing drums, sometimes you need one trick, sometimes need a lot, but above all: BE CAREFUL! One of the most important aspects of mixing is knowing when to stop.
Drum sub groups and stems. Depending on how many drum tracks you have, it’s a big help to stem your sections (i.e. overheads and rooms to a stereo pair, toms, multiple kick drum or snare mics, etc.) so that once you get the blend of each sounding good, you can use the sub groups to mix the whole kit together. This works for the entire drum kit as well, sending them all to a stereo sub group, so that you can use it to not only blend the kit in the mix, but also add some final tweaks to the sound by adding a little overal EQ or compression.

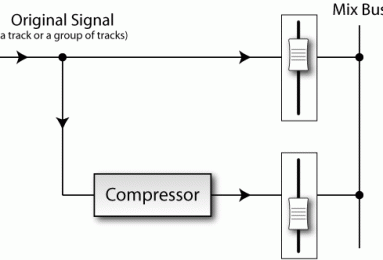
Sum / parallel compression. It’s unfortunately easy to have a drum recording that lacks punch and power. Moreover, it can get lost or be too dominant at certain places in the track, which throws the entire mix for a bad loop. Sometimes you can get control by simply adding overall compression to the drum subgroup. One must be careful, however, because that can result in your drums lacking presence, dynamics, and leave them feeling dull. Trying parallel compression of the entire drum kit can help bridge that gap.
There are a couple different ways to achieve the signal routing you need, so for this example let’s just say that you already have the entire drum kit to a stereo sub group, and have the ability to create another stereo subgroup with the same input so that you effectively have two stereo tracks both of which have the entire drum kit. Take the “second” stereo sub group and put some agressive compression, or even a hard limiter on it, then turn it all the way down in the mix. Slowly bring it up so that it progressively blends with the original drum sound. As you bring up that fader, you will be adding more of the “controlled and compressed” kit into the mix to balance out the dynamics, while simultaneously not losing the open, non-compressed sound of the original tracks.
Try adding some different EQs to the “second” subgroup as well to see how it sounds as you blend it in.
Double up. Either during recording or in mixing (preferably the former option) so that you can blend mics on the same sound source to get the sound you want. My most common double during tracking is for the kick drum: a mic inside to capture the skin, slap, attack, a fuller mic slightly outside, and possibly even a third further out if you’re looking for a more live, open, old-school rock n’ roll vibe. You can EQ, compress, and blend these together to get the kick sound you ultimately want for the track.
But if you’re just mixing and have only one track, try triggering samples or doubling the region and then sound replacing to get the sound you want. The mere fact that you can EQ and compress these tracks with different settings makes a huge difference in those cases where your track is “missing” something in a certain frequency range.
Gentle audio gates & expanders. For live drums, be gentle and let them stay real. Bleed is a pain, but it’s even worse if your gates are set too hard so that when they open there’s a jolt of the cymbals or the ring of other toms. When setting your gates, go ahead and be agressive with the the amount of attenuation so that it’s easier to set the threshold, attack and release, but once that’s done, back off of the attenuation so that they aren’t “completely closed”. Listen through at different levels and see if it sounds more natural, but still getting you a little more control.
Remember the skin and air. Just because a kick drum is predominantly a low frequency instrument does not mean that it doesn’t have a lot going on in the upper frequencies. The more to slope or filter out the highs the less “real” and open that instrument will become. It will sound more tacky, rubbery… like bad MIDI sounds, really. If that’s the sound you want, then just sequence it! If you want real, don’t suffocate the highs and remember the skin sound.
For example, rub your hands together and listen. That’s skin. You want that with a good drum sound. Granted, the attack is so quick you can’t hear that exact sound, but it’s in there. Your mix need air & high frequencies to get that natural and open sound.
We’ll always post more and encourage you to do the same, but the above will give you good goals and things to think about when mixing drums. Give them a try. Take what works for you and throw away the rest ;)
Published: by | Updated: 02-26-2017 11:28:49


