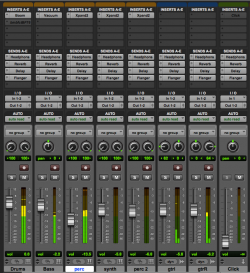
 When setting up parallel effects in Pro Tools (or any digital audio workstation) it’s all about bussing and using aux sends to to route your signal. (Step by step towards the end of the article.)
With effects when mixing, 99% of the time you do NOT change the outputs of the audio tracks or insert the effect on the track itself. That wastes processing power, causes too many plugin delays, makes it much harder to audition and automate blends, and makes it impossible to EQ or compress the effect return separately.
Using sends (auxiliaries / auxes / internal busses) is the correct way to set up time based effects when mixing (time-based effects are also called parallel effects, because they run in parallel to the signal you’re mixing, not in the signal chain like you would for a compressor, gate, EQ, etc. as an insert into the signal path)
Using time-based effects on a send / aux and returning it on a bus in mixing software allows you to send multiple signals to THE SAME effect. This is very important for two reasons:
- Processing: you’re using only one (for example) reverb plugin instead of many, and more importantly,
- you’re sending all the signals to the same “space”. Picture a band playing in an auditorium: they’re in the same space, which menas they’re “sending” to the same reverb: the auditorium.
- There are some times when you might want a longer decay time on a lead vocal than on a guitar, which requires more than one reverb or delay in a mix, but in general, keep “mixing in the same space” in mind, and that reverb, delays, etc. have a big impact on that.
A basic guide for the kinds of effects when you use sends and aux / bus tracks for mixing effects:
- Reverb
- Delay
- Chorus
- Flanger
- Phaser
Kinds of effects where you do NOT use aux sends and bus tracks (98% of the time you do these as inserts on the channel)
- EQ
- Compressor
- Limiter
- Gate / Expander
Those are a starting point there are times when you might want to use parallel compression or get really fucky by playing with phase when you’ll use sends on a limiter or compressor, but if you’re looking up this article, then don’t try that just yet. Know the rules and why we follow the rules first, THEN you can break them to do some crazy mixing ;)
Steps for setting up effects in pro tools using aux sends / busses:
Create your effect:
- Create a STEREO aux input fader (NOT audio. it’s basically nothing more than having a stereo fader on a real console, you’re just creating it in the software.)
- Insert the time-based plugin (reverb, delay, chorus, etc.). This is exactly the same as patching the output of outboard gear into the input of the channel of a real mixing console. You still have NO SOUND… all you have is a fader with the plug in inserted.
- Make sure the mix of the plugin is at 100% (you do NOT want anything under 100% so that that fader has only the effect, not any of the other signals that are unprocessed. You use the mix option only if you insert parallel effects on audio faders or if you have more than one effect plugin on a single aux track)
- Make the INPUT of the aux trac a bus that you are not yet using (think of that as your patch cable)
- That’s it. Your effect is set up and is now ready to send
Send the signals you want to the effect
- Pick a signal that you want to send to the effect you created above
- Go the the sends section in the mix window and create a new send
- The send you create must be THE SAME BUS that use used as the input to the aux fader created above (that’s like the other end of the patch cable, or turning up that aux if you’re using a real console; however you can visualize it, run with it).
- As soon as you start to turn up that send on the same bus (assuming it’s playing and there’s signal) then you’ll see signal in the effect fader you created that’s 100% the effect.
- Use the effect fader to get the blend you desire, and repeat the send on any other signals that you want to have the effect. By adding a send on the correct bus on any track, then they get that effect in the mix.
- SOLO ISOLATE the fader that has the effect. (Command + click on the solo button on a Mac). Solo Isolate means that, when in a destructive solo mode (SIP, mix mode solo, depends on the software what they actually call it), the fader that’s solo isolated (the effect fader) doesn’t get cut… why? That means that you can solo a channel that’s sending to an effect, and you still hear the effect. If you don’t solo isolate the effect return, then when you solo, say, the vocal, then all the effects on the vocal get cut, so all you hear is the dry signal without any effects.


