Basic studio wiring setup for a split console.
First: what’s a split console?
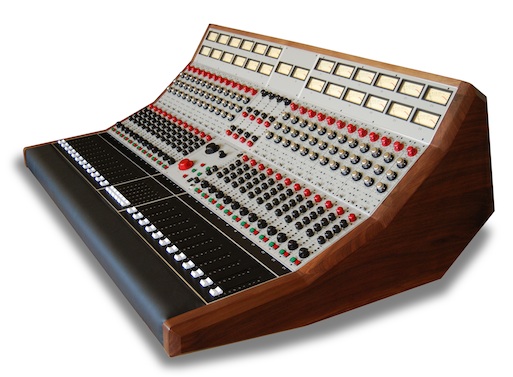 Recording / mixing consoles are generally described as either split consoles or inline consoles. Knowing exactly what a split console is will help be a huge help in making the right choices when wiring your studio. The importance of knowing the signal flow of your console cannot be overrated: being a master of every bus means you can move and manipulate a signal in any way your brain can imagine. The best painters need to know how their paint and brushes work, so too do audio engineers about the signal flow of all their gear. (Jump directly to: how to set up a split console in a home studio)
A split console is the most common for home recording studios. They have one signal per channel or module (the channel signal), as opposed to an inline that has two audio signals (the channel and monitor signal). Inline consoles are usually only found professional recording studios because of their increased flexibility to route signals, and they have can have a huge i/o count without needing a 40-foot long footprint.
The channel signal is the audio signal going through the mic/line amp on that module (mic or line input), whereas the monitor signal is coming back FROM your recording device (tape machine, computer interface, etc.), hence monitor channel. When recording, the channel is for your mics, and in mixing it’s for your tape returns (most inline consoles have global modes that do all that switching for you).
Inline means you can have your tape send AND tape return on the same module (you’ll have two faders on the module, big and little for channel and monitor, or for smaller inline consoles a fader and a pot to control the level of the monitor signal). Often you’ll have different signals on the send vs. return paths depending on how the mics are patched and the order in which you like to record on tape.
On the other hand, a split console means you have your tape send on a DIFFERENT module than your tape return, hence the console is split (as in split in half: half are tape sends, and half or tape returns) YES you need to listen to both signals – NOT at the same time, but to ensure that your listening to the signal at all the gain states to and from tape as well as for correctly creating headphone mixes for your artists.
Basic split console home studio wiring set up:
(The wiring diagram is for a 8 track tape machine, but it’s exactly the same as if you have an 8 channel interface for your computer, and also the same concept if you have 24, 32 or 48 i/o on your console):
- The inputs from your microphones (usually coming into the control room via a snake) get plugged into one “half” of your console mic/line inputs (in this case channels 1-8). You’ll have more than 8, but that’s OK, that’s why you need a patchbay so you can re-patch to the input you want, or even better, use subgroups.
- Take the direct outputs of those channels where your microphones / line signals are coming into the console and plug them into a pactchbay (half-normalled). The bottom row of that patch bay then gets sent to your tape machine / audio interface. That means if you do NOT patch, the signal you have coming into your console on channel 1 will get recorded on track 1. BUT by using the patchway, you can also cross patch to another track if you want (easier than changing the input of the mic all the time)
- Here’s where the split console comes in: the TAPE RETURNS (output of the tape machine or interface) then come back into the console on different inputs on your console, in this case channels 9-16. This is where you listen to your tape returns.
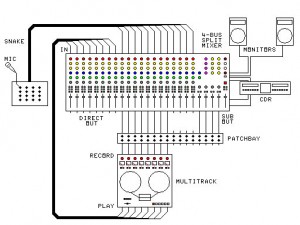
click to enlarge. thank you midi magic for part of this image. had to change it a little bit, but it saved a lot of time drawing it all from scratch - Important: don’t listen to both mic input and tape return of the same signal. That’s double monitoring and it’s bad. Listen to your mic input to set input levels, for sending the signal you’re recording to headphones during overdubs, etc. 95% of the time you listen to tape returns.
- Take the monitor output and send to your monitors (NEVER SEND THE MASTER OUTPUT TO MONITORS!!!)
- Send the master output to your 2-track recording master. If you’re sending back into your digital audio workstation (DAW), then patch the master outputs of your console into your patchbay, so when you’re ready to record your mix, cross-patch the master outputs back into your interface so you can record them (**** BUT MUTE THE TRACKS IN YOUR DAW THAT IS THE RECORDING THE MIX OTHERWISE YOU’LL GET NASTY FEEDBACK ****)
- If your console has subgroups, patch those into your patchbay as well. This will let you comp (create subgroups or mixes of multiple signal) while recording. It can be helpful as well to create stems within your mix by using an analog signal which can help warm up the sound a bit.
Published: by | Updated: 07-02-2014 08:27:59


