Acoustic treatment for your home recording studio:
A control room you can trust is something you need to do BEFORE you even think about flipping on the power and sitting in your mixing chair. Adding acoustic treatment to your home studio isn’t too hard. You can do your own acoustic treatment if you know some of the basic concepts.
Sadly, the most we tend to see in home studios is people throwing up a lot of low-density foam without any thought as to why or what’s happening with the sound. Acoustic treatment on your walls isn’t just about deadening high frequencies – you need to get balance high to low frequencies and control reflections.
In this article we’ll talk about tips and ideas to preserve the stereo image from your studio monitors, and increasing overall clarity in the mixing room with absorbing and trapping: building a room you can trust so that what you hear in your control room is well-balanced, and you know your mixes will work in a wide variety of environments thereafter.

We are not talking about buying pre-fabricated acoustic panels or bass traps. Here we’re talking about do it yourself acoustic treatment. Designing your acoustic “devices” and then building them yourself to fit the room where you’re recording and/or mixing. You have to plan first: be smart about it, don’t just glue foam to the wall that you got wholesale from a furniture store.
Yes, you can build your own acoustic panels with some tools and a run to Home Depot. (For meeting half-way, check out the DIY materials section of acoustimac). Building them yourself is not as easy as just dishing out $200-3000 each for a RealTraps acoustic panel or a pre-made acoustic treatment room kit… but if you do it right, it will sound better, look more integrated into your home studio, and hopefully you’ll have a much better understanding of how sound actually works and travels, which will always make you a better audio engineer. A good engineer is a smart one who knows sound so well they can visualize it moving around a room.
There are really only a handful of key acoustic terms you need to always keep in mind when considering acoustic treatment inside your studio (we’re not dealing with isolation in this post, will do that later):
Reflection, Absorption, Density.
Understanding these concepts helps you better grasp in general what acoustic treatment actually does. Far too many people just do it because they know they should (by putting up only a bunch of acoustic panels). To be a better audio engineer… you need to know this stuff, too: how sound travels, and how to control it.
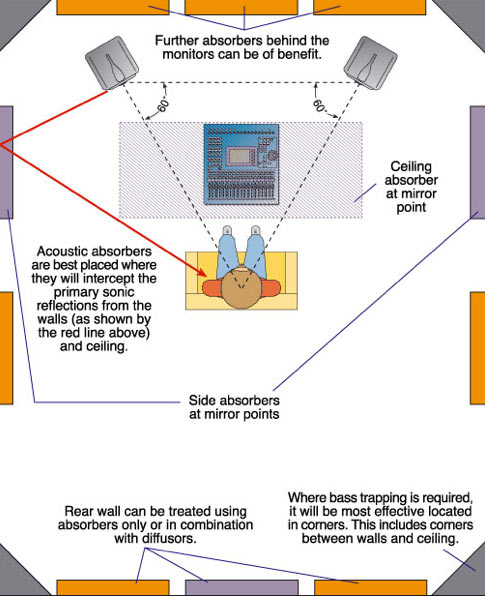
This first image (thank you Sound on Sound) is a good demonstration of the primary reflections: the first place that the sound waves will reflect on your ceiling or walls and “bounce” directly back to your ears (that’s bad). Where something reflects directly, you want to deaden that with absorption, and panel absorbers coupled with a diffusion in the rear. Focus on your high to mid frequencies (high frequencies are “more directional” insofar as your ears can tell from which side higher frequencies are coming, hence, reflections from those frequencies are most noticeable).
This is where density and thickness come into play. Basically, the MORE dense, and thicker a material, the lower the frequency it’s able to absorb (by absorbing its energy). Light blanket will only absorb the “small” frequencies… high… so if all you do is put up low-density, thin material, you’re only changing the high frequencies. Good acoustic treatment covers the entire spectrum.
Some materials you can buy that when built in different configurations will give you pretty much all the frequency absorption you need / can do for a home recording studio. These are all for absorption panels and traps. Isolation is a different beast that pretty much requires only two things: mass and space. But back to acoustic materials:
- Rock wool lose (blown in) insulation.
- Fiberglass or Rock wool rigid insulation (panels) 2″ thick
- Packing blankets (UHaul)
- Fabric (to make it look pretty)
- Plywood or fiberboard 1/16 & 1/8 inch thick
Pretty simple Home Depot run. There is acoustic fabric, but you can probably get away with not taking that leap (it’s not the cheapest thing in the world – and if you get something like animal prints or craziness I’ll hunt you down! Keep it classy and universal.)
Start with panels for those primary early reflections. Your rigid fiberglass will help with those a low. Some keep it very simple: cut the panels and wrap in cloth; don’t even bother with frames. And vary the density: a couple 2″ and a few more double width (because remember: varying thickness will help absorb different wave lengths). Build a frame to if you want to make it look better, but simply putting a frame around the rigid fiberglass won’t make that much of a sound difference: you have to add space and another material.
To think about absorbing sound energy: hang a blanket outside from a clothesline then throw a baseball at it. The blanket absorbs the energy of the baseball. The same thing happens with sound waves. But the blanket NEEDS TO MOVE. If the blanket is hanging against a wall, the ball hits it, pushes to the wall, then bounces back at you. So the more energy that is being “thrown” at your acoustic absorption material, the more “space” it also needs to successfully absorb the energy. That’s why we call them “traps” of bass traps.

Sound energy is acoustically decreased in your mixing room by being absorbed… that means vibrating. You don’t see it, but for the high frequencies, the cloth, foam, and fiberglass are vibrating when they’re hit… so lower frequencies need material that is MORE dense to absorb that energy. They also need space and air.
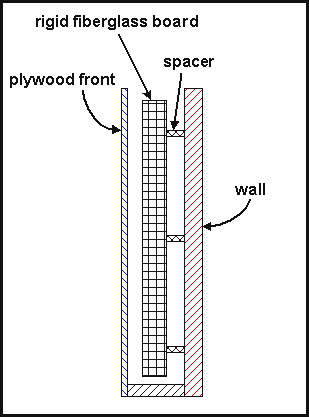
First for those panels mentioned above: if you just mount them against the wall, you get high frequency absorption…. but then glue four spare pieces on the back so that it’s mounted off the wall by an inch or two, and you will also absorb more lower frequencies as well. But just one material isn’t enough for the LOW freq. so that’s where the plywood and/or fiberboard come in (image shows a acoustic panel bass trap). If you build these as an box (rather than directly against the wall as in the diagram), then on the back-most section, tack on a packing blanket as well.
That makes the order: plywood front, space, fiberglass rigid board, space, packing blanket, back of the panel box.
- Wood front (thin) that will vibrate when low frequencies hit it (energy transfer)
- Space: it needs air in between to give room to vibrate. HOWEVER, you want that space to be as small as possible.. exactly enough space to let the wood vibrate, but not too much
- Rigid fiberglass board then absorbs the energy from the vibrating wood panel, which kills its energy
- The fiberglass board is also mounted away from the wall so that there is additional air to deaden any remaining sound wave energy.
So take that concept and apply density and space as needed to get lower and lower frequencies (basically, anyway).
So now corner bass traps. I like starting with a panel like explained above (you don’t have to 100% seal it).
- Put a 1/16 inch sheet of perforated fiberboard (lots of little holes) at a 45 degree angle in the corner (this will be the outside)
- Then some rigid fiberglass an inch away behind that (like the trap panel image above),,
- Place another 1/16 sheet or perforated fiberboard so you have a sandwich happening.
- You can also tack a packing blanket to the back of the second piece of wood.
- That leaves you with a big empty space in that corner… which is where the spray rock wool comes in: fill up that cavity and pack it tight. (Density and air – you need some space behind the blanket in order for it to stop the baseball.). You can build it about a foot to the ceiling, then put in the rock wool from the top. Use a panel via step six to top it off.
- Do your best to make sure the edges are as sealed as you can get them, and give an angle at the ceiling and floor points (by essentially cutting a triangle piece of wood that will fit in that space and remove the 90 degree angle).
Once you have all the materials and the basic concept of how material density relates to which frequencies are absorbed, then you can do a lot of acoustic treatment for a home studio on your own.
Published: by | Updated: 09-02-2016 08:53:49


