In a home studio: placement of studio monitors matters.

Your studio monitors are not there to look good, they’re there to SOUND good. Sounding good in terms of a recording studio does not directly mean LOUD, or a ton of bass that your neighbors can hear from down the street, it means clean sound and true sound. Reproducing the sound so that you can trust that what your speakers are doing is correct. You can help ensure this with proper speaker placement and a small amount of acoustic treatment in the room.
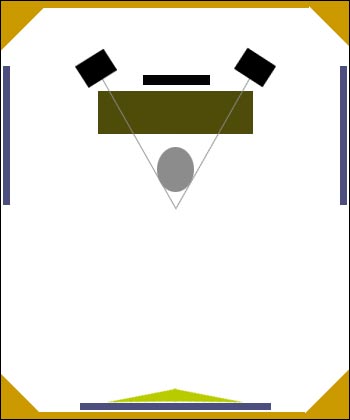
We’re assuming you have a relatively small room to work in, just like most home studio set ups. (Forgive the quality of the drawing, but all the principles are what matter in positioning your speakers for optimal listening.)
Studio Monitor Positioning: Height.
Higher frequencies are “more” directional than lower (why for very low frequencies reproduced by subwoofers you only need one: because those frequencies are non-directional, whereas the highs are). As such, you want the tweeters (and if you have one, the mid-driver) to be pointed at your ears. If you cannot mount them at ear height (not often the case because of issues with your desk, stand height, etc.), then you need to angle the speaker cabinet so that those tweeters are in a direct line to your ears.
Do NOT put speakers on their sides if you can avoid it. Why? Because that puts the tweeter and any mids coming from the driver(s) on a different axis, which, while it’s extremely small, changes the distance between each sound source and your ears, and therefore the arrival time to your ears. It’s like putting your ears out of phase and distorts the stereo image. (This is one reason while I like the dual-concentric design where the center-point is the same for tweeter and driver).
It’s OK if the woofers are not pointed at your ears; The tweeters and mid-range driver are the most important in that regard.
Studio Monitor Positioning: Angle.
In general you want your studio monitors to be angled at 30 degrees from the center line, which basically creates the 60 degree angle at the back of your head where they would intersect if you were to draw a line (and an equilateral triangle so internal angles are all 60 degrees).
Important to note that the intersection is BEHIND your head not at your nose, so that the most focussed sound hits your ears. Since your speakers are likely mounted higher than you are when sitting in your mixing chair, angling them down using a wedge is fine, just try to keep it under 10 degrees or so so that the cabinet remains well balanced.
Studio Monitor Positioning: Distance from Wall.
You do NOT want your studio monitors to be up against the wall. The manner in which the sound (and early reflections) propagate and hit your ears if too close to a wall can change how they sound. If you’re not soffit mounting (mounting inside a wall), then give yourself about 10-12″ to be safe. That also gives you plenty of room to treat that wall to help decrease and reflections.
Basic Acoustic Treatment to Help Reflections.
A lot of people call it the “mirror test” which basically means while sitting, if your room was covered in mirrors, any place you can see the monitors in the mirrors needs to have decent absorption with some sort of acoustic treatment to prevent the most direct reflections of sound in the room. Putting up some acoustic panels (blue) can help. Go further with a panel absorber and diffusor combination in the back, and treat the front of the room as well so that the sound hitting you from the front is coming from the speakers, not reflections from the front wall.
This is important because every time an indirect “sound” hits your ears you are hearing it slightly later than the sound coming directly from the speakers. We perceive, or our minds interpret stereo based on arrival time of those directional frequencies, so if your mixing room has a lot of reflections, then your stereo image is distorted (among other things).
Published: by | Updated: 08-11-2014 14:07:54


