Recording vocal tips: proximity effect (too much bass), polisives (pops of air), sibilance (“s” and “sh” are too strong), and the ever illusive “capturing a great vocal performance”.
 Successfully recording a great vocal sound requires employing different recording techniques and very much depends on the vocalist’s ability. As a recording engineer there are a handful of things you can to do technically improve the sound, which are the areas on which we’ll focus. In the end, if the vocalist isn’t that good, then there’s only so much you can do (in that case, often times NOT having a high quality sound might help mask faults in the instrument).
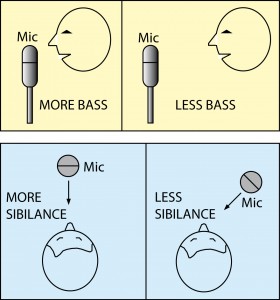
You must start with a good understanding of the proximity effect (or bass “tip up”) that happens when recording vocals using a cardioid microphone. The proximity effect can be either good or bad depending on the situation. It can help make your vocals cleaner by knowing to reduce it, or make them fatter and more “intimate” when using the proximity effect to augment the vocalists real voice.
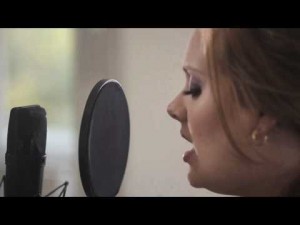
One of the most common problems audio engineers try to solve when recording vocals are the plosives. Plosives are the really strong Ps and Bs that occur due to too much air being forced upon the microphone diaphragm, which creates a low-end “bump” and rumble. There are three ways to help prevent this problem:
- Use a pop filter when recording vocals to help get a cleaner vocal sound. Pop filters aren’t magic, though, you still need to get your angles and distance correct. You need to visualize what the air is doing and how the pop filter can deflect and soften it.
- If you don’t have a pop filter use a pencil taped to the microphone. If you have a vocalist with a lot of pops and puffs even with a pop filter, you can add a pencil along with a pop filter to try and get it under control.
- Work with a great vocalist who uses good mic techniques. I’ve worked with singers in the past who don’t need pop filters or even compressors. Singers who have been doing it for awhile know they’re own style and voice, an most times which mics they like to use. They will turn slightly to help prevent the loud Ps and Bs, pull back further when they get louder to control the dynamics, and lean in really close when they want more low-end and intimacy in their voice. If you record audio for a living and really care about music and great sound, it’s actually a cool thing to watch and listen to an experienced singer in the studio. Humbling, really. You can teach these things to newer singers, but it don’t try to coach them technique if it will throw off their performance. It’s always better to get a great performance and have a couple technical problems, then a perfect technique and a performance that’s boring and lacking any emotion.

Too much sibilance in a vocal track is also a problem for many recording engineers. This is a little easier to resolve with a plugin, but I’m more of a fan of getting a good sound recorded to tape first. Sibilance is an issue of consonant sounds. Depending on the person the frequency range between is between 3.5k-7.5k (wide range, I know, but such is life).
When deciding how much to dampen sibilance always remember: you’re SUPPOSED to have S and SH sounds in a vocal. Don’t go crazy trying to get rid of them entirely with a de-esser. A simple way to start: move your mic off axis. I found this sort of goofy, but helpful graphic on L2P.com that shows both the proximity effect (how close to the mic the singer is) and how to decrease sibilance (moving off axis). If the singer still has very harsh sounds then try putting on an foam “windscreen” as a last resort (the type that physically goes over the top of the mic; not a pop filter that is placed in front it the mic).
Getting a good performance out of singer can make or break a song. You can get away with a lot of bad sound quality issues if the vocal performance is amazing. A great performance should always trump perfect recording technique.
Start with your mic placement: not in their face, ask if they have a preference for up or down, make sure your pop filter mount is out of the way – anything that will make them physically feel comfortable with the mic itself. Do the same with the recording space (be it a room or a vocal booth). Everything from lighting to how it smells should be addressed so that the “under the microscope” feeling all singers get when in the studio is as mitigated as possible.
Let your singer warm up first without the track (traditional warm ups, but not for too long; just to loosen up a bit and clear their head). BEFORE you start playing the track in their headphones (you better have good headphones btw), set up some standard vocal FX not for recording but for their mix to help them feel more like they’re “in” the mix (pretty standard would be to preset a reverb, delay, and chorus effects). Do it ahead of time so that you can quickly ask, and quickly give the singer any vocal effects they might want. Again note: do NOT record the FX. These are just to help them perform.
As you start recording, go ahead and go through the entire track a couple times to get into the swing and so you can get to know the song a little bit. Just record, pull the region to a muted track, and start recording again (you might get enough in the takes to comp a final track). Listen for when they are pushing too hard or not enough. Try blending the other vocal takes into their headphones as stacks. It can help them sing a little louder or give a more aggressive performance b/c they’re effectively competing w/ the other vocal tracks.
Listen to the lyrics and make sure the vocal quality matches the song. Too many people forget that songs are about something; they have meaning. The sound to capture should match that. If the lyrics are more like a sappy ballad, get the singer closer to the mic to take advantage of the proximity effect (it’ll sound more like the person is whispering in your ear).
Practice how different distances sound in your recording space. Record really close, then 3-4 inches away from the mic, then 6-8 inches away, etc. Also experiment with off-axis recording (so the microphone diaphragm is NOT at a right, 90 degree angle with the sound source; singing sort of sideways into the mic). As an audio engineer, you should know how all those mic placement options can change the recorded sound, which means… do it, take note, and use that knowledge when setting up a new singer taking into account their voice and the song.
Get that performance out of them. If they’re not cutting it: call it a day (if studio time and money isn’t a big issue). Your job is to get a great sound, and if the singer can’t do it, try a few things to pull it out of them, but if it ain’t happening, don’t accept a performance that’s second-rate. Think of singing as also having a bit of acting in it: you need a great tonal performance AND acting performance to get a great vocal recorded for the track.


